MemberTies includes a selection of predefined reports, designed to provide printed access to the most common information. There are, of course, hundreds of ways you might choose to use the system to track your data, especially when you consider the options available with custom fields or Categories & Items.
If you are in need of a special report that is not available and cannot be created using the user-defined reports capabilities in MemberTies Professional, let us know. If the report you need makes sense for general public distribution, we'll probably add it to the system. Otherwise, we can create reports to meet specific requirements as "custom reports" for a fee.
When you select a report, a "Settings" window will normally appear to enable you to choose the records that will be used in the report, and to control various settings specific to the report you chose. Often this is only the title, but others, such as an Account Statement, or Summary report have many options to control the display.
Normally the most important thing is the search criteria that controls which records are displayed on the report (i.e., a criteria might be, "City = My Town" to only display members of a particular city. The system remembers the settings you selected from one use of a report to the next, and you can also save and reload search criteria like other search windows.
How Do I Create a ______ Report?
One of the most common support questions is something like, "How do I create a Past Due Members report?" or, "How do I create a Dublin Members report?" The answer is, you don't create a report like that. What you do create is a report that includes the fields you want to show, and then you use report Search Criteria to determine what the report really means. For example, a simple columnar report that includes just the First and Last Name and Home Telephone Number can easily be:
•A past-due members contact list -- by using search criteria to only retrieve members with an End Date in the past.
•A Dublin members contact list -- by using search criteria to only retrieve members with a City of Dublin.
•An "activity attendee" list -- by using search criteria to only retrieve members who attended a specific activity.
•An honorary members list -- by using search criteria to only retrieve members with the Honorary status.
The idea is simply that when you define a report, you are defining the presentation of the data, not the meaning of the report. Of course you may want certain fields to show because of the way you plan to use it, but the key thing to remember is that the search criteria that determines what kinds of records are found, and therefore what the report really "means."
The "Active Address"
MemberTies Professional enables you to save multiple addresses per membership record. If the report you are printing includes address data the system must make an association between the main data (say membership name information) and address data. To do this, the system needs to know which address to use in the event that more than one is available.
By default, whatever address is currently "Active" (based on a date range, or simply the Active switch on the address) is the one that will be used. However, if a Settings window is available for the report, a basic criteria called "Active Address" enables you to specify whether you want the address that is active, or the address(es) that are not active.
Basic Search Option
The same thing can be done with an Advanced search, by choosing the Active Address field.

Advanced Search Option
Preview Mode
To display the report in "Preview Mode," click the Preview button in the Printing section of the ribbon. This toggles the view between preview and normal modes. When preview mode is off, the page count displayed on the report represents the "screen pages", i.e., what can be seen on the screen at one time is considered to be a "page." To see how many pages a report will actually be when printed, turn preview mode back on.
Note: Multi-column reports will display as a single long column if preview mode is turned off, because it disables the formatting.
Report Logo
The logo set in the Default Logo report preference will automatically appear on system and user-defined standard reports, rosters, directories, and cards.
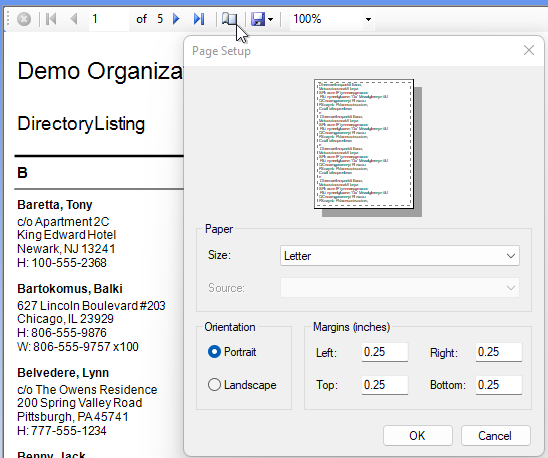
Report Margins
Printers vary widely. The system uses a general setting for report margins designed to accommodate most printers. If your reports print incorrectly, use the Page Setup button in the editor ribbon to access these settings.
Misc Ribbon Options
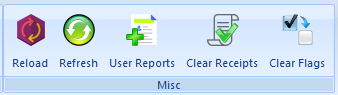
•Refresh - to re-retrieve the report using the current settings
•User Reports* - to manage user defined reports
•Clear Receipts - to clear all of the Print Receipt flags on all records
Report Ribbon Options
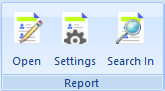
•Open - to open a specific report
•Settings - to go back to the report settings window
•Search In - to find text anywhere in the report