Views you create can be modified at any time. If a view is no longer needed, even temporarily, you can change its Active status to hide it until it is needed again.
Loading an Existing View
1. Choose the Members, Groups, or Activities tab from the ribbon bar.
![]()
2.Click the Views button in the Layout section of the ribbon.
3.The View List window will display a list of all active views. Select the desired view.
4.Click Load Selected to apply the new view.

| Note: If the view has an associated Auto Query, it will run automatically if the Run Query box is ticked. If you want to apply the view without changing the records that are currently displayed in the list, be sure the Run Query box is cleared. (If there is no Auto Query associated with the selected view, the Run Query box setting is ignored.) |
Adding a View
| 1. | Choose the Members, Groups, or Activities tab from the ribbon bar. |
![]()
| 2. | Click the Views button in the Layout section of the ribbon. |
| 3. | The View List window will display a list of all active views. Click Add to create a view, or Copy to duplicate an existing view. This will enable the editing area below the list.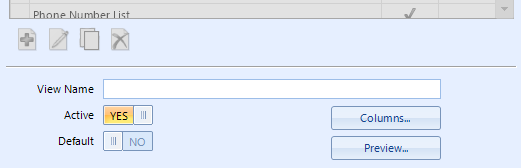 |
| 4. | The following fields are available: |
•View Name - a short but descriptive name for the view, i.e., "Phone List", "List for Mailing Service", etc.
•Active - indicates whether the view will be available to use
•Default - one view can be marked as the Default, and that view will load automatically when the list is opened
•Auto Query - if you want a particular saved query to run automatically instead of the default when the view is opened, select it here. Leave it set to "(None)" to use the default. See Saving Criteria for more information about saved queries.
| 5. | After naming the view, click the Columns button. |
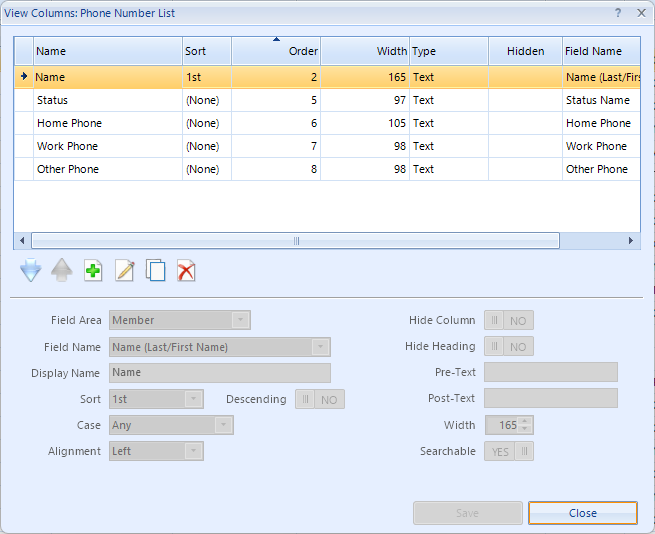
| 6. | The following fields are available: |
•Field Area - the general data area of the field. This selection controls what fields are available in the Field Name list.
Note: This field cannot be changed after saving.
•Field Name - the specific field to show. In our example we've selected a smart field that shows the name in Last, First order.
Note: This field cannot be changed after saving.
•Display Name - the name as it should appear in the column heading. In our example, we changed the original "Name (Last/First Name)" value to, "Member Name".
•Sort - if the view should be sorted by the contents of the field, choose the sort here. You can specify up to 5 levels of sort, i.e., to sort by Name and then by Postal Code, you would set the name as the 1st sort, and the Postal Code as the 2nd sort. A field does not have to be visible to be sortable (see below).
•Case - enables you to force text field contents to be upper or lowercase. The default is "Any", meaning, leave it as-entered.
•Alignment - enables you to force the contents to be left, center, or right-aligned within the column The default is Left aligned.
•Hide Column - select this option to hide the entire column. This is helpful if you want to sort by this field, but don't want to actually see it. For example, suppose you use the combined First Name/Last Name smart field for display, but want to sort on the last name only. Since the combined field starts with the First Name you can't sort it or you would be sorting by first name. Instead, add the Last Name field as well, hide it, and set it as the 1st sort to solve the problem.
•Hide Heading - select this option if you want to see the field, but want the heading left blank.
•Pre-Text - text to be displayed to the left of the data for the field (you can leave leading or trailing spaces in this field).
Tip: When defining a column on a user-report, you can force a blank line to appear above a particular line by entering "<br>" (without the quotes) in the pre-text field. (This will not work for Views.)
Technical Note: The "<br>" is not actually HTML code, we just use that for simplicity.
•Post-Text - text to be displayed to the right of the data for this field (you can leave leading or trailing spaces in this field).
Note: Pre and Post-Text values are intended to be used however you choose. One possibility is to use Pre-Text in place of the column heading. In other words, if the column's "Hide Heading" option is turned on, no heading will appear. But you could use Pre-Text to show "Tel:" in front of each phone number (i.e., displaying as, "Tel: 123-456-7890")
•Width - the pixel width of the column. This value is set to a default based on the selected Field, and is normally modified by resizing columns in the Preview window. But the field is displayed here for convenience, if you know that you like 100 as a width for certain types of data and want to set it manually. It also allows for small adjustments when necessary.
•Searchable - indicates whether data in this field will be included when using the search box at the top of the applicable list (Membership list, Group List, etc). This defaults based on whether the selected field is a Text field or not, but it can be overridden as you wish.
| 7. | Create and save all columns as needed, then click Close to close the window and return to the View List. |
| 8. | Click Preview |

| 9. | The preview window enables you to visually adjust column widths to best fit your data. You can resize any column by dragging the border between heading cells. Note: preview data is fake data. It does not pull data from the database. Columns are populated with representative data of average length. You will know your data best and can resize the columns as appropriate. |
| 10. | When you're finished, click Save to return to the View List |
| 11. | Click Save to save the finished View. |
| 12. | If you would like to see your new View in action, click the Load Selected button and the view will be applied to the list. |
Tip: You can only rename an existing view via the Maintain Views window. To do so, select the view in the list, then right-click the view and choose Rename from the popup menu.
Changing a View
You can edit an existing view from the View list. Any part of the view can be modified, though if you want to change a field to a different field, you will have to delete the unwanted field and add the new one. Changes will take effect when the view is saved and loaded.
Deleting a View
You can delete an existing view from the View List. If the view is currently in use (by yourself or any other user) it will remain active until the list displaying it is closed. When that list is reopened it will use the new default view if one is available, or will revert to the system default view.
Things to Consider when choosing fields:
When choosing fields, it is very important to consider the data type of the view you are creating. Even though you can choose almost any activity, group, or membership field, they can change the behavior of the view. For example, if the view is for Membership data, adding activity fields will convert it into an "activity attendance" style of view, where only members who have attended an activity will display. Likewise, adding dues posting fields to a membership view will turn it into a dues postings view, and only members who have dues postings will be considered.
List Type |
Type of Field Added |
Restricts the View to: |
Members |
Member |
No Restriction |
Activity |
Members who have attended at least one activity. |
|
Posting (Dues) |
Members who have at least one dues posting. |
|
Posting (Donations) |
Members who have at least one donation posting. |
|
Group |
Members who are assigned to at least one group. |
|
Activities |
Activity |
No Restriction |
Membership |
Activities with at least one attendee |
|
Posting (activity) |
Activities with at least one posting (attendee or non-attendee) unless a membership field is also used, in which case the postings must be tied to an attendee. |
|
Custom Field |
Activities with at least one attendee (if a member custom field) or at least one attendee who is a member belonging of a group (if a group custom field) |
|
Groups |
Group |
No Restriction |
Membership |
Groups with at least one assigned member. |
Selecting fields outside the norm for the list type may also produce seemingly duplicate records. For example, if you add the Activity Name to a Membership List view, the view must find only members who have attended an activity, and if a member attended three different activities, they will appear in the results three times.