User defined reports are easier to create than cards and labels, because all fields appear on the same line (with the exception of Roster reports, which are formatted like labels). However, you have some additional options with reports, because each field has a "header" at the top of the column that normally contains the field name.
Working with User Reports
1.Choose the Reports tab from the ribbon bar.
![]()
2.If the Choose Report window opens automatically, click Cancel to close it..
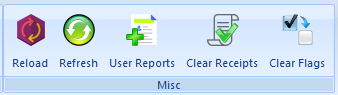
3.Click User Reports in the Misc section of the ribbon.
4.The User Reports window will open, listing all currently defined user reports, and their active status (inactive reports exist, but cannot be selected to run on the Reports window).
5.To add a new report, click Add, or, select an existing report and choose Edit, Copy, or Delete.
6.The following fields are available:
•Report Type - the type of report. The examples below show how the available fields change based on report type.

Business Card Options

Label Options

Logo Card Options

Photo Card Options

Post Card Options

Report Options

Roster Options
•Logo - specifies the logo to display on the left side of the card. This button is only visible for Logo Card reports. By default, the report will use the Report Logo set in preferences if you leave it blank or the specified file cannot be found. The logo image file is square, and will display best if it is roughly 144x144 pixels square. Note: If your logo is not square, create a 144x144 pixel square graphic with a white background, and place your logo in the middle of it, leaving the extra white space untouched.
•Data Type - focuses the report on member, group, or activity data. This can have a significant effect on how quickly the report can run. i.e., if you choose Activity, but only use Member fields, the report has to do everything by starting with an Activity, finding all of its Attendees, getting member data for those attendees, and then rendering the report and applying search criteria. Furthermore, the report might have to show the same member once for every activity they have attended, because as far as the report knows, the activity is changing even if the member is not.
Starting with a data type of Member would mean direct access to the fields you want and less chance of duplicate data appearing.
•Report Name - the name of the report as it should appear on the Choose Report window.
•Default Title - the title that appears at the top of a standard report or roster report. This field is not used for labels and cards because there is no header area. Note that the title can be changed on the report Settings window when running the report, just like system reports.
•Paper - the paper size. This field is set automatically when choosing the Format on all label/card reports.
•Orientation - sets portrait or landscape orientation. This field is set automatically when choosing the Format on all label/card reports.
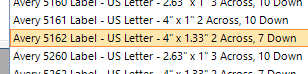
•Format - the predefined card or label format to use. The list includes the Brand, Brand ID, Type, Paper Size, Dimensions, and count across/down the page.
•Show Return Address - controls whether the return address defined in preferences is displayed on the left side of the card. This button is only visible for post cards.
•Layout - lists the column/heading options for a roster report. This option is only available for rosters.
•Active - controls whether this report is available for selection and display/printing via the Reports window.
7. Once the basics for the report are set, click Columns.
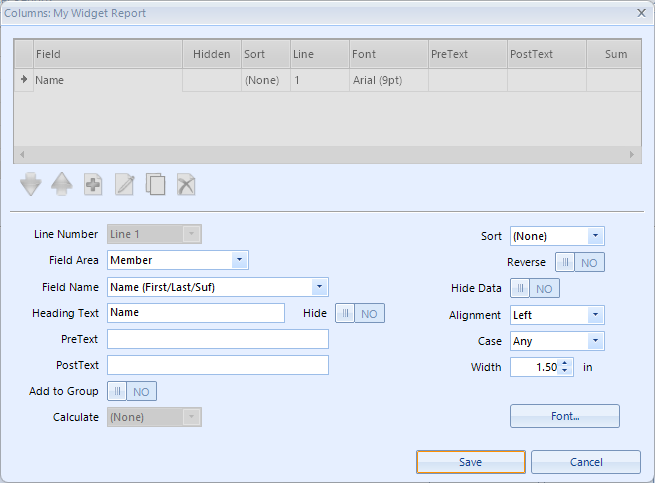
8.The following fields are available:
•Line Number - for multi-line reports like labels, cards, and rosters, this controls the line on which the field will appear. For a standard Report as shown above, this is disabled because everything is on line 1.
•Field Area - the general data area of the field. This selection controls what fields are available in the Field Name list.
•Field Name - the specific field to show. In our example we've selected a smart field that shows the name in First, Last order (plus suffix).
Note: In the list of fields that are already defined, you can see we've also added the Last Name field by itself, and it is hidden. However it is also the 1st sort, so we're sorting the report by a column that is invisible, so the report can show the first/last name normally.
•Heading Text - the name as it should appear in the column heading.
•Hide - controls whether the heading text itself is hidden
•PreText - text to be displayed to the left of the data for the field (you can leave leading or trailing spaces in this field).
Tip: You can force a blank line to appear above a particular line by entering "<br>" (without the quotes) in the pre-text field. (This will not work for Views.)
Technical Note: The "<br>" is not actually HTML code, we just use that for simplicity.
•PostText - text to be displayed to the right of the data for this field (you can leave leading or trailing spaces in this field).
Note: Pre and Post-Text values are intended to be used however you choose. One possibility is to use Pre-Text in place of the column heading. In other words, if the column's "Hide Heading" option is turned on, no heading will appear. But you could use Pre-Text to show "Tel:" in front of each phone number (i.e., displaying as, "Tel: 123-456-7890")
•Add to Group - controls whether this field will be part of a group heading, meaning all records with matching "group" fields will be listed together on the report.
•Calculate - if a numeric field is selected, this provides options to display a sum, total, or average of that field at the bottom of the report or group.
•Sort - if the view should be sorted by the contents of the field, choose the sort here. You can specify up to 5 levels of sort, i.e., to sort by Name and then by Postal Code, you would set the name as the 1st sort, and the Postal Code as the 2nd sort. A field does not have to be visible to be sortable.
•Hide Data - controls wither the entire field is hidden, such as in the example above with the Last Name field that is being used only for sorting.
•Alignment - enables you to force the contents to be left, center, or right-aligned within the column The default is Left aligned.
•Case - enables you to force text field contents to be upper or lowercase. The default is "Any", meaning, leave it as-entered.
•Width - the width of the column in measurement unit of the report (inches/mm). This value is set to a default based on the selected Field, and is normally modified by resizing columns in the Preview window. But the field is displayed here for convenience, if you know that you like 100 as a width for certain types of data and want to set it manually. It also allows for small adjustments when necessary.
•Font - allows adjustments to font settings for data in this field
9.Create and save all columns as needed, then click Close to return to the previous window.
10.Click Preview.
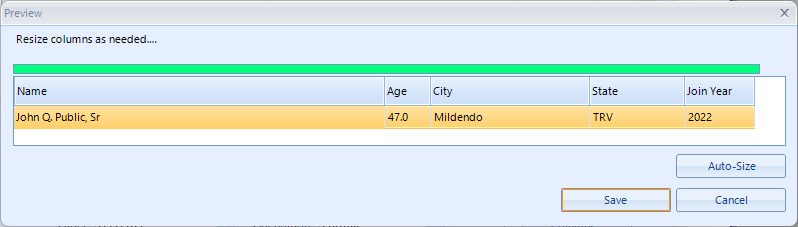
11. The preview window enables you to visually adjust column widths to best fit your data. You can resize any column by dragging the border between heading cells.
Note: preview data is fake data. It does not pull data from the database. Columns are populated with representative data of average length. You will know your data best and can resize the columns as appropriate. The Auto-Size button will resize each column proportionately to try to fill the entire width.
12.When finished, click Save to return to the previous window.
13.Click Save to save the finished report. Close and re-open the Reports window and the new report should appear in the list of reports to open.