Several types of data can be imported into the database from a delimited text file. "Delimited" means that each "chunk" or field of data is separated from the previous chunk by a character of some kind. The best formats are called "tab-delimited" (often with a .txt extension) and "comma-delimited" (often with a .csv extension).
You can usually look at the data to tell how it has been saved. The file should be plain text (if you see funny black or white squares in the text -- remove them).
Tab-delimited data is often better, because you may have legitimate commas within the text of a field, and these commas could confuse the import engine into thinking a new field has been started.
For example, tab-delimited data might look like this:
John Smith Anytown PA 75074 United States
But comma-delimited data would look like this:
John,Smith,Anytown,PA,75074,United States
The first rule to remember about importing data is that if the data you are importing is not consistent, you will probably have trouble getting a clean import. The better the data coming in, the less cleanup you'll have to do afterward. Sometimes it is a good idea to open your entire data file in something like Microsoft Excel, so you can view all the rows and columns of data at once. Scan through it and look for inconsistencies, stray characters, missing data, names with new-line or carriage returns in them, etc. Clean it up as best you can, then save the data to text again.
It is also important to remember that the system assumes the record being imported is the way you want it to be. The only data that is automatically added if not found is for fields that are required in the system. A good example is the Start Date. There is a preference to default the start date to the current date or some specific date, but it does not apply to imports because the Start Date is not required.
Importing from an Excel File
Before you can import data from an Excel file, you must first convert it to a plain text file. This is done from within Excel itself, as follows:
1.Open the file in Excel.
2.Choose File > Save As.
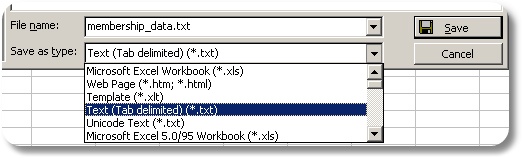
3.Depending on your version of Excel, there should be an option at the bottom of the Save As window to set the File Type. Choose "Text (Tab Delimited)" as shown below:
4.Now the data is in a format that can be imported.
Blank Rows
Make sure your import file doesn't have any blank lines in it. The import may stop when it finds the blank row, thinking it has reached the last record in the file.
Updates vs New Records (Membership Data Only)
When you import data, the system will make a decision as to whether the data is new, or an update to an existing record. This is done by looking for the Member ID field in your import map file. If you are importing a Member ID, the system will check the database for a matching Member ID on an existing record. If found, data will be used to update the existing record rather than create a new record.
If the data for a field being imported is blank, the system ignores it and does not change the membership record being updated. However, if you really want to import blank data to clear existing data in a field, import the text =CLEAR (that's an equal sign followed by the word 'clear' with no spaces). The system will respond by clearing any existing data in the target field.
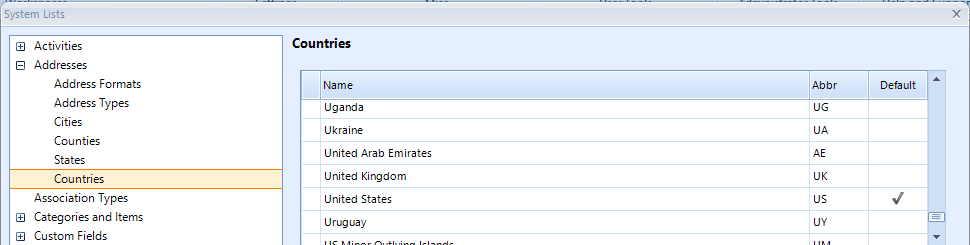
Note: It is a good idea to verify the available State/Province, Country, Phone Type, and Status codes before attempting an import if your data needs to match these values. Each of these code lists are available via the Home ribbon > Lists window. This is important, because if you import a status called, "Family" and do not have a status in the system by that name, the default status will be used -- possibly generating incorrect data.
Importing Data
1.On the Home ribbon, choose Import Data from the Misc section.

2.When the window opens, it is divided into two sections. In the Choose Import File box, the File field lets you choose the text file containing your data. Click the browse icon to the right of the field and select your file, then choose the appropriate Delimiter for your data.
Note: If you receive an error that the file is in use or otherwise cannot be opened, make sure you don't still have it open in Excel, or some other program that was used to create or view the file.
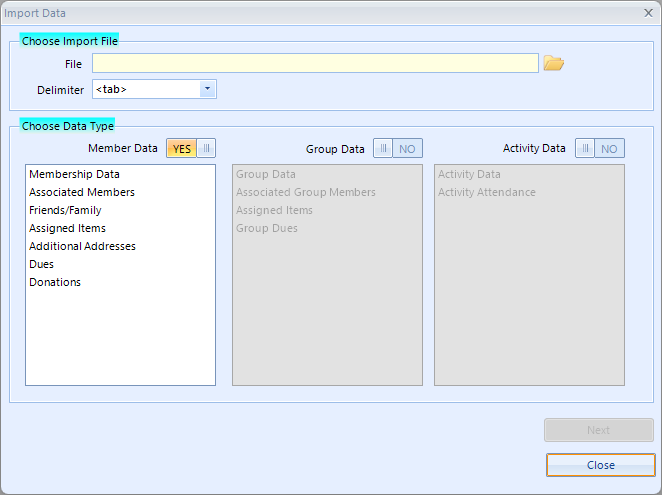
3.Specify the primary type of data you are importing (Member, Group, or Activity). This will enable the sub-category list so you can be more specific. These choices will determine the fields available for import and also which, if any, fields are required to be part of your import file.
Member Data choices
•Membership Data - enables you to import new, or update existing, membership records, including General, Status, and Custom data.
•Associated Members - enables you to import member-to-member relationships, including the Association Type, date, and comment. The following fields are required in the import file:
| Member ID - Must be an ID that matches an existing membership record. Associated Member ID - Must be an ID that matches an another membership record. |
•Friends/Family - enables you to import friend/family records to existing membership records. The following fields are required in the import file:
Member ID - Must be an ID that matches an existing membership record.
First Name - The first name of the person being added
Last Name - The last name of the person being added
•Assigned Items - enables you to import assigned item data. The following fields are required in the import file:
Member ID - Must be an ID that matches an existing membership record.
Assigned Category Name - Must be the name of an existing Group item category.
Assigned Item Name - Must be the name of an existing item under the specified category.
•Additional Addresses* - enables you to import additional (non-current) addresses to existing membership records. The following fields are required in the import file:
Member ID - Must be an ID that matches an existing membership record.
Address Type - The address type to use for the new address record. Be sure the address type you import actually exists.
Country - The country on the address. This can be a country name or code, i.e., "United States" or "USA" that exists in the list of current country codes.
•Dues* - enables you to import dues entries to existing membership records. The following fields are required in the import file:
Member ID - Must be an ID that matches an existing membership record.
Date Posted - The date for the dues entry
Amount Posted - This will be set to 0.00 if not provided
Posting Type - Must be a posting type in the format, "Dues Charge (D)", i.e., the posting type name, followed by a D or C (debit or credit) in parenthesis, just like it appears on the list on a membership record.
•Donations* - enables you to import donation entries to existing membership records. The following fields are required in the import file:
Member ID - Must be an ID that matches an existing membership record.
Date Posted - The date for the dues entry
Amount Posted - This will be set to 0.00 if not provided
Posting Type - Must be a posting type in the format, "Donation (C)", i.e., the posting type name, followed by a D or C (debit or credit) in parenthesis, just like it appears on the list on a membership record.
Group Data choices
•Group Data - enables you to import a new Group record, including any field on the General and Custom tabs of the group record.
•Associated Group Members - enables you to import new member-to-group relationships. The following fields are required in the import file:
Member ID - Must be an ID that matches an existing membership record.
Group Name - Must be a name that matches an existing group record.
•Assigned Items - enables you to import new assigned item data. The following fields are required in the import file:
Group Name - Must be a name that matches an existing group record.
Assigned Category Name - Must be the name of an existing Group item category.
Assigned Item Name - Must be the name of an existing item under the specified category.
Activity Data choices
•Activity Data - enables you to import a new activity. The following fields are required in the import file:
Activity Name - The name for the activity
Activity Location - The name of an existing activity location.
•Activity Attendance* - enables you to import attendance (and associated postings) for an existing activity. The following fields are required in the import file:
Activity Name - Must be the name of an existing Activity.
Member ID - Must be an ID that matches an existing membership record.
If posting data is imported as well, the following additional fields are required:
Posting Type - Must be a posting type in the format, "Activity Income (C)", i.e., the posting type name, followed by a D or C (debit or credit) in parenthesis, just like it appears on the list on an activity record.
Note: If the import results in an activity now having more attendees than the specified activity capacity, a notice will be displayed in the results area. The system will always import all records regardless of capacity.
4.Click Next
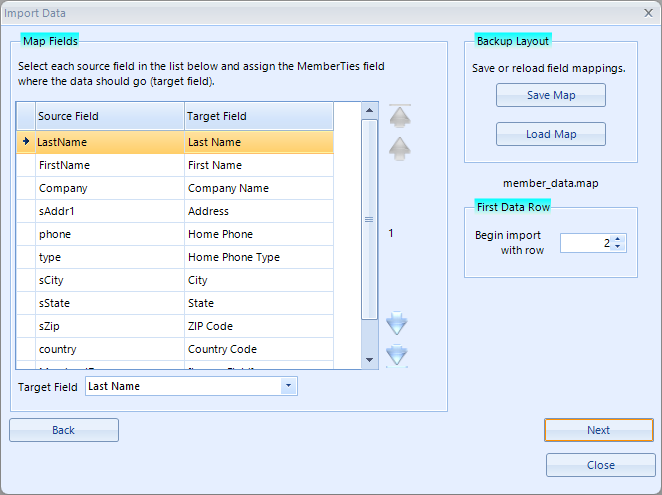
5.Data will be read from your file held for display as sample data in the "Map Fields" section. You can page through this data one record at a time using the arrows next to the list. Depending on whether your data has a header row or not (i.e., the first row contains the field names), you will either see headers or your first line of data.
Note: The system automatically looks for a saved map file with the same name as your import file. i.e., if your import file is mydata.txt, the system looks for mydata.map in the same location. If found, it is loaded automatically.
| Note: If you see a blank line and have to click the down-arrow a couple of times to get to the data, you need to fix your import file. Blank lines in an import file can cause the import to stop prematurely, so you should remove them. The first line of data should either be headers or actual data. |
6.This page enables you to specify a target field for each piece of data you are importing. Click each row in the grid, and choose the Target Field from the list below. In the example above, we're showing row 2 of the data (the first row of actual data), and have selected "Last Name" as the Target Field for the first field that contains "Smith" as data. For each row, you must select to either:
•Ignore it - If you don't want to import data for this field for some reason, either leave the target blank, or choose "[Ignore Field]"
•Map to a Specific Field - If the field contains data that belongs in a specific field, such as "last name", you can simply select the specific target field (i.e., "Last Name")
•Split Data to Two Fields - A split is needed when your field contains combined data like, "Smith, John". In this case, you don't want to move the contents to either the Last Name field or the First Name field; you want to divide it between them. In this case, you would select "[Split First-Last Name]" and then specify which part of the split comes first. Splits are available for dividing a Name, or a Work phone number/extension. If you have other combined fields, you will need to modify your data to separate them into their own columns.
| Note: If you are importing data to custom fields, you must set up your custom fields first so they are defined for the proper kind of data. All existing custom fields will appear in the Target Field list. When creating the custom fields, remember to mark them as available for imports! Also, a custom field defined as a checkbox will recognize import values of Y/N, Yes/No, True/False, On/Off, and 1/0. Note: Some things are required by the database, and have to be imported in order to have a valid record to save. For example, every record has a Country, every phone number has a Phone Type, etc. If your import file does not include this data, the default set on your database will be used. All of the default values can be verified on their respective lists via Home ribbon > Lists. |
7.The "Backup Layout area enables you to save your work and reload it later. Creating a correct map can be time-consuming. You can save your work at any time by choosing "Save Map." Once saved, you can reload it at any time. (This can really help if your first import map doesn't work and you need to adjust it.)
Note: You should save your map file with the same name as your import file, but with the .map extension. That way the system will automatically find and reload it whenever you open the same import file.
8.The "First Data Row" area is used to specify which row is the first row of "real" data in your file. For example, if your import file begins with a row of column headings (which is very common), you would want to start the import with row 2, not 1.
9.When you're ready to import, click Next.
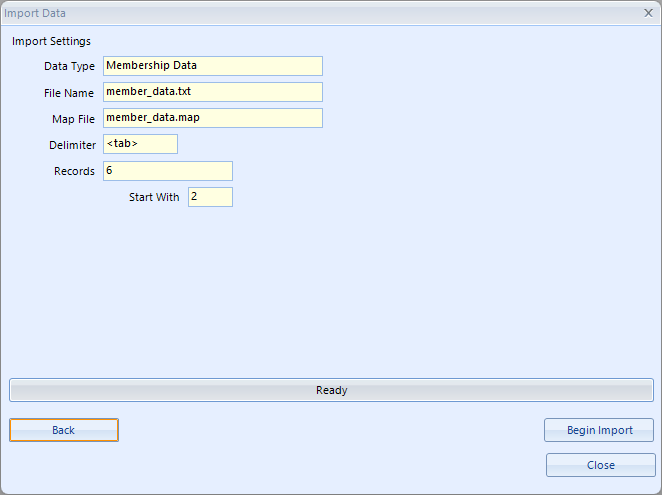
10.Review the Import Settings and if everything looks good, click Begin Import. The system begin the process of moving all of your data to the database.
11.If any errors or warnings occur, they will be written to a log file and a message will offer to open the file for review. The log file will always be saved to your Documents\MemberTies\Logs folder.
Here is an example of an import file showing an error:
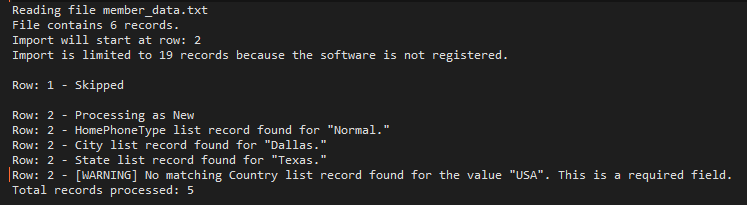
In this example, we used "USA" as the country, but if we look in the Country list, the code for USA is actually "US", which explains why it was not found. Since the Country is a required field, the record was skipped. We just need to update our import file and use "US" as the country (or United States) and it will work.
Other common errors that may be reported include:
•A member ID was not found when importing a secondary address, so the data couldn't be linked to an existing record and imported.
•Invalid data, such as mapping a phone number to a birth date field, or something similar.
| The error messages should be fairly self explanatory, and will include the row number in question so you can find the original data. |
12.If the import is successful, a message similar to the following will display:
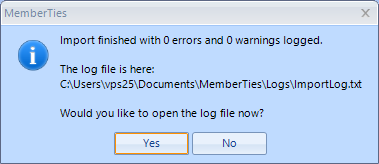
13.Choose Yes or No as desired. When you return to the Import Data window, the "Begin Import" button will be disabled because the import process has completed.
14.Click Close and verify the data within the system. If you find problems, you can delete all the imported data, modify your map or data, and try again.
* Professional Version Only